Discovering Wicket 1.3
Par
Pachod Joseph (Page perso)
Wicket 1.3 is here, let's dig deeper into Wicketland. First of all, we'll see the basics of this framework.
I. Introduction
II. Discovering Wicket Quickstart
II-A. Installing the QuickStart
II-B. QuickStart content
II-C. Getting started
III. Creating an Ajax enabled and autosaved textfield
III-A. Purpose
III-B. Creating a basic form
III-C. Putting an Ajax button into it - discovering Wicket Ajax basics
III-D. Changing an existing component through Ajax - using the target
III-E. Re enabling the button on text change - dealing with Wicket's behaviors
III-F. Adding the autosaving functionnality - using the AjaxTimer
III-G. Making reusable components - using a Panel
IV. Conclusion
I. Introduction
This tutorial is designed as a "first hands on wicket" one. Only some basic knowledge of Java and html are needed. To make it attractive and pertinent in regard of Wicket capacities, we'll do a "wicket and Ajax enabled autosaved textfield". And it's simpler than it writes !
II. Discovering Wicket Quickstart
II-A. Installing the QuickStart
The Quickstart project is an already setup wicket website. Oh, for sure, it's a fairly basic one, with only one page. However, to get it running right from the start, the jetty webserver is embedded as well. So it's a quick way to start with wicket !
You can find it on
Wicket website, on the...
Quickstart page. The website being in English, as the current text, I won't put here the installation info found on the website. Follow them and then move on the next part ! Just a last point : I did this tutorial using Eclipse 3.3, so you're better off opening the project with Eclipse. I called my project tutorial from the organisation org.zedros.
II-B. QuickStart content
What do we find in this application ?
First of all, we find the wicket framework itself, as well as a sample application and an embedded webserver called Jetty. Thus you can directly launch and use the sample application, without the burden of having to install a webserver. Furthermore, the turnaround time (time of restart) of Jetty is pretty low (I had read that it was among the shortest... What's best for development mode ?).
Then you have the Wicket application. In the org.zedros package, you can easily spot some peculiar files :
- WicketApplication.java : the wicket application, where you setup your application, notably the first page to be displayed.
- HomePage.java and HomePage.html : a wicket page and its html template. Currently both the Java page and its template are quite empty, but we'll change it soon !
As with any Java website, another important file is the web.xml one. As usual, it defines the web application. When looking at it, you can see that Wicket uses a filter instead of the usual servlet. This allows a more fine grained way of telling which paths are part of the web application, allowing to put multiple kind of files on the same webserver even if some of them aren't managed by Wicket.
It's all you need to have your first Wicket application running ! Do a mvn jetty:run in your project directory and there you are.
II-C. Getting started
Wicket offers many possibilities to get started :
- the Wicket Examples, which are directly in the main Wicket jar, available
there.
- last but not least, the wicket mailing list is incredibly responsive and instructive. If needed, one can easily drop a question and get an answer really fast. In fact, most of the Wicket core developers are on it, so the answers are really first class ones.
III. Creating an Ajax enabled and autosaved textfield
III-A. Purpose
Bright as you are, you now have a rough idea of how Wicket is working. However, you've been told plenty of times that wicket allows painless Ajax and you want to test it barehanded. Here you are ! We'll do it on a basic but pertinent need : an autosaved ajax textfield. We won't save the text for the time, but it would be straightforward to do so.
III-B. Creating a basic form
In wicket, to create page, you have to create the appropriate html page, with some wicket:id attributes in the "wicket enabled components", and then map it with the Java page.
For that, be aware that the page component hierarchy is to be respected. For example, if you a textarea in a form, you'll have to declare... a textarea in a form in the wicket java page.
So, in your HomePage.html page, add a form, a textarea and a button :
<html>
    <head>
        <title>QuickStart</title>
    </head>
    <body>
        <h1>QuickStart</h1>
        <p>This is your first Wicket application.</p>
        <form wicket:id="firstform">
        Text area : <textarea rows="4" cols="20" wicket:id="mytextarea"></textarea>
        <input type="submit" value="Save"/>
        </form>
    </body>
</html>
|
As you can notice, it's some pure html but the wicket:id attribute. A few others wicket attributes exist as well, but overall your page will always stay close from an html one. Special care has been made for that by the wicket team. You could now to whatever html fancy stuff of your wish, as long as the wicket:id are here and the main model hierarchy respected, it will work.
You may notice as well that the button has no wicket:id. Indeed, we just need it to submit the form, and nothing else. As such, we don't need any capacity of wicket, so we stay on the html level.
On the Java side, you have to declare these components :
@SuppressWarnings("serial")
public class Index extends QuickStartPage {

	private String textarea;

	public Index() {
		super();

		Form form = new Form("firstform"){
			@Override
			protected void onSubmit() {
				super.onSubmit();
				System.out.println("Have been there, entered that : \n " + textarea);
			}

		};
		add(form);

		TextArea textareaInput = new TextArea("mytextarea",
				new PropertyModel(this, "textarea"));
		form.add(textareaInput);

	}
}
|
Once again, it's pretty straightforward. You can easily spot that two components have been created. The form has been directly added to the page, and the textarea to the form whom it belongs to. Each component has been given its wicket:id found in the page. No extra presentation information has been needed, like the number of columns or whatever. It's in the html page, so we don't repeat it!
For the overridden onSubmit method, things may be more troubling : have you noticed we have been using brackets just after the "new Form("firstform")" ? It's a anonymous inner class. Behind this quite barbarous term, it's just a class that has been extended. Inside this newly created class, we have overridden the onSubmit method.
Considering the textarea, there is a "new PropertyModel". What is it ? It's one of the way Wicket can store data for you. Here, we have just told wicket that a property, an object attribute if you prefer, called "textarea" and present in "this" class we'll be used to store the content of the textarea input. And, surprisingly, you can spot a "private String textarea" in the page class.
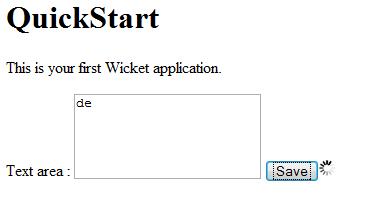
To test your newly created page, just press "Run" in eclipse. It should pick up the Start.java file, which contains the main class. If not, help him to do so. Then go on "http://localhost:8081/quickstart/app/" and you should see something like that :
We agree that the look of this page is pretty basic. But it's just some simple html file : you're free to do whatever you want in it, go for it. When you click on the save button, the Eclipse output will appear as expected. Enter some text in the textarea and it'll appear.
If you change something in the html page, it'll be automaticaly picked up by Jetty, as you're in development mode (it's written in the web.xml file). For the change on the Java side, you'll have to restart your application.
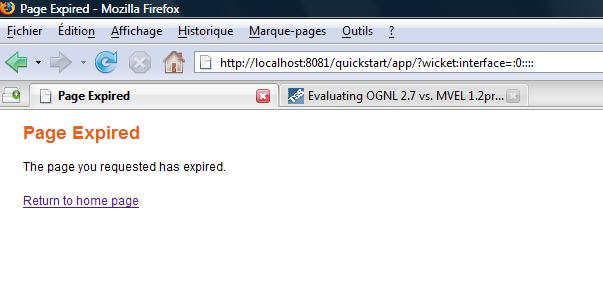
Then, in your browser, you may encounter (on a page refresh), the following page :
What is it ? Simply that, due to the restart, the session set up for this page has expired. Indeed, wicket starts a session for most of the page it deals with. As well, if there's no action for quite a while (the session timeout time), the user will encounter the same page. Be aware, however, that some mecanism exists to redirect the user to some peculiar page and then back to the previous one. It's commonly and easily used to deal with user login and may be part, one day, of another article.
A last advice : using Eclipse, you're better off launching the web app in "debug" mode. This way you'll benefit from basic JMV class reloading (when the class
shape doesn't change). Thank Matej for the tip!
III-C. Putting an Ajax button into it - discovering Wicket Ajax basics
You now have the basic form to work on. First of all, for easier reading and comprehension, we'll do a class called AutoSavedForm. As you guess, it'll contain our form and deal with its saving. As I'm a lazy guy, and that currently I don't plan to use this form somewhere else in my application, I will create this class as an inner one :
@SuppressWarnings("serial")
public class Index extends QuickStartPage {

	public Index() {
		super();

		final AutoSavedForm form;
		form = new AutoSavedForm("firstform");
		add(form);
	}

	class AutoSavedForm extends Form {
		private String textarea;

		public AutoSavedForm(String id) {
			super(id);
			TextArea textareaInput = new TextArea("mytextarea",
					new PropertyModel(this, "textarea"));
			add(textareaInput);
		}

		@Override
		public void onSubmit() {
			System.out.println("Been there, entered that : " + textarea);
		}
	}
}
|
For the time, it's just a simple move of the previous code, nothing fancy. Notice however that nothing has been done on the html page. The view hasn't changed.
Let's add the interesting bit : an Ajax submit button. As we like the user to know what's going on, we'll display as well a little image when a post is going on.
Good news, such a button already exists, in the wicket extension project. So, it just ends up as a new component. As any other component, we have to define it in the html page :
<html>
    <head>
        <title>QuickStart</title>
    </head>
    <body>
        <h1>QuickStart</h1>
        <p>This is your first Wicket application.</p>
        <form wicket:id="firstform">
        Text area : <textarea rows="4" cols="20" wicket:id="mytextarea"></textarea>
        <input type="submit" wicket:id="button" value="Save"/>
        </form>
    </body>
</html>
|
On the Java side, it's a new component in our form constructor:
public AutoSavedForm(String id) {
			super(id);
			IndicatingAjaxButton button = new IndicatingAjaxButton(
					"button", this) {

				@Override
				protected void onSubmit(AjaxRequestTarget target, Form form) {
					System.out.println("Text from the button : " + textarea);
				}
			};
			add(button);

			TextArea textareaInput = new TextArea("mytextarea",
					new PropertyModel(this, "textarea"));
			add(textareaInput);

		}
|
Once again, we've created an anonymous inner class to override the onSubmit method. Notice that you give the form to the Ajax button : it means this button could be anywhere on the page, not only in the form itself as we do here. Nothing call the form onSubmit method anymore, only the button one is activated.
Restart your application, and play with it. When clicking on the button, an image should now appear shortly :
The image appears in fact as long as the onSubmit method requires, which is quite short for the time. However, it helps indicate to the user that something has been done, even if a full page reload wasn't done.
You may also notice a link "WICKET AJAX DEBUG" on your page. This functionnality has been automatically added since we're using Ajax in development mode. It allows you to see all the Ajax communication going on as well as the interactions on the page. This is a much handy feature when dealing with complex Ajax form ! Furthermore, the Wicket Ajax Debug Window can be moved or resized at will, making it even better suited for its role.
III-D. Changing an existing component through Ajax - using the target
To pursue our goal, we need the button to be disabled after each save and reenabled on text change. First, let's see how to disable the button.
In fact, as you may have spotten, in the Ajax button onSubmit there's an attribute called "target". To the target you'll add the component to been redrawn after the Ajax cycle. In our case, it means adding the button itself, and then unabled it :
		public AutoSavedForm(String id) {
			super(id);
			TextArea textareaInput = new TextArea("mytextarea",
					new PropertyModel(this, "textarea"));
			add(textareaInput);

			IndicatingAjaxButton button = new IndicatingAjaxButton(
					"button", this) {

				@Override
				protected void onSubmit(AjaxRequestTarget target, Form form) {
					System.out.println("Text from the button : " + textarea);
					target.addComponent(this);
					this.setEnabled(false);
				}
			};
			add(button);
		}
|
As told before, it's as simple as adding the component to the target, then do whatever pleases us on it.
III-E. Re enabling the button on text change - dealing with Wicket's behaviors
Now that we are able to disable our button, let's see how to re activate it. In fact, we need the button to be re activated when the text changes. It means we need to add a behavior to our textarea. And it's a simple as that :
	class AutoSavedForm extends Form {
		private String textarea;

		public AutoSavedForm(String id) {
			super(id);

			final IndicatingAjaxButton button = new IndicatingAjaxButton(
					"button", this) {

				@Override
				protected void onSubmit(AjaxRequestTarget target, Form form) {
					System.out.println("Text from the button : " + textarea);
					target.addComponent(this);
					this.setEnabled(false);
				}
			};
			add(button);

			TextArea textareaInput = new TextArea("mytextarea",
					new PropertyModel(this, "textarea"));
			add(textareaInput);

			textareaInput.add(new AjaxFormComponentUpdatingBehavior("onkeyup") {

				@Override
				protected void onUpdate(AjaxRequestTarget target) {
					target.addComponent(button);
					button.setEnabled(true);
				}
			});
		}
|
Once again, it's all done in the constructor itself. We have added the behavior named AjaxFormComponentUpdatingBehavior, which means it'll be done through an Ajax call.
Then, we've informed Wicket of the event interesting us. On this case, as we want our button to react quickly and smoothly, it's on key up (a standard Javascript event).
Finally, as we need the button to be accessible through this new anonymous inner class, we've made it final, meaning we'll do the affectation only once, and thus allowing us to use it in the inner classes.
As said before, it's really object oriented and efficient.
III-F. Adding the autosaving functionnality - using the AjaxTimer
Our text can now be saved through Ajax using a button. But we would like it to be autosaved. Of course, we wish as well that the button be disabled after saving. So be it !
In fact, we'll add an Ajax timer to the page, or, more exactly, to our AutoSavedForm. In its constructor, we hust:
			add(new AbstractAjaxTimerBehavior(Duration.seconds(15)) {

				@Override
				protected void onTimer(AjaxRequestTarget target) {
					if (button.isEnabled()) {
						saveContent();
						target.addComponent(button);
						button.setEnabled(false);
					}
					;

				}

			});
|
We've added the AbstractAjaxTimerBehavior and defined the refresh time. For that, we've used the helper class called Duration. It allows us to quickly define some time interval, be them in seconds, minutes, hours or whatever.
Once again, we've added the required component to the target then acted on it. You may have noticed as well this saveContent() method. It's to avoid repeating us, even if the saving action is pretty dumb currently. Here is its code, put in the form :
		public void saveContent() {
			System.out.println("Text to save : " + textarea);
		}
|
For sure, go update the button with it as well ! BTW, while you're at it, disable the button at creation time, it'll be even better.
So what do we have now ? A working Ajax enabled and autosaved textfield ! However, this nice form is trapped in our HomePage.java class. How can we deal with it ?
III-G. Making reusable components - using a Panel
In fact, many solutions are open to you :
- creation of a public class AutosavedTextForm : this way, you'll be able to do new autosaved forms easily, requiring only to declare the right components in the .html of your page.
- creation of a panel : a panel is a Wicket component being able to contain others components and their html markups. This way, next time you'll be willing to use the autosaved textarea, you'll just need to declare your panel (one component) in your .java/.html
- using page inheritance : Wicket allows you inherit another page, containing as well some markup and components.
Let's do it with the panel. First of all, we have to create the Panel class. It's just a class inheriting the Panel class and containing everything we've done up to now :

package wicket.quickstart;

import org.apache.wicket.ajax.AbstractAjaxTimerBehavior;
import org.apache.wicket.ajax.AjaxRequestTarget;
import org.apache.wicket.ajax.form.AjaxFormComponentUpdatingBehavior;
import org.apache.wicket.extensions.ajax.markup.html.IndicatingAjaxButton;
import org.apache.wicket.markup.html.form.Form;
import org.apache.wicket.markup.html.form.TextArea;
import org.apache.wicket.markup.html.panel.Panel;
import org.apache.wicket.model.PropertyModel;
import org.apache.wicket.util.time.Duration;

@SuppressWarnings("serial")
public class AutosavedTextPanel extends Panel {

	public AutosavedTextPanel(String id) {
		super(id);
		final AutoSavedForm form;
		form = new AutoSavedForm("firstform");
		add(form);
	}

	class AutoSavedForm extends Form {
		private String textarea;

		public String getTextarea() {
			return textarea;
		}

		public void setTextarea(String textarea) {
			this.textarea = textarea;
		}

		public AutoSavedForm(String id) {
			super(id);

			final IndicatingAjaxButton button = new IndicatingAjaxButton(
					"button", this) {

				@Override
				protected void onSubmit(AjaxRequestTarget target, Form form) {
					saveContent();
					target.addComponent(this);
					this.setEnabled(false);
				}
			};
			button.setEnabled(false);
			add(button);

			TextArea textareaInput = new TextArea("mytextarea",
					new PropertyModel(this, "textarea"));
			add(textareaInput);

			textareaInput.add(new AjaxFormComponentUpdatingBehavior("onkeyup") {
				@Override
				protected void onUpdate(AjaxRequestTarget target) {
					target.addComponent(button);
					button.setEnabled(true);
				}
			});

			add(new AbstractAjaxTimerBehavior(Duration.seconds(15)) {
				@Override
				protected void onTimer(AjaxRequestTarget target) {
					if (button.isEnabled()) {
						saveContent();
						target.addComponent(button);
						button.setEnabled(false);
					};
				}
			});
		}

		public void saveContent() {
			System.out.println("Text to save : " + textarea);
		}

		@Override
		public void onSubmit() {
			System.out.println("I've been there and seen " + textarea);
		}
	}
}
|
Then, we need the corresponding html :
<wicket:panel>
        <form wicket:id="firstform">
        Text area : <textarea rows="4" cols="20" wicket:id="mytextarea"></textarea>
        <input type="submit" wicket:id="button" value="Save"/>
        </form>
</wicket:panel>
|
Then, in our page, we just need this very component, so the index became :
public class Index extends QuickStartPage {

	public Index() {
		super();
		add(new AutosavedTextPanel("panel"));
	}
}
|
And the html :
<html>
    <head>
        <title>QuickStart</title>
    </head>
    <body>
        <h1>QuickStart</h1>
        <p>This is your first Wicket application.</p>
		<div wicket:id="panel">
		</div>
    </body>
</html>
|
Notice the div tag. It allows Wicket to replace it at runtime with the real content. If needed, we could have added some html content in this span, to allow a designer to have a rough idea of the page look.
You can run once more your application. It still rocks, and now you have an easily reusable autosaved textfield !
IV. Conclusion
I hope this little tutorial has given you a good insight of some of wicket's key features, allowing the developer to easily use Ajax and then reuse his work anywhere.
Thanks for your reading !


Copyright © 2007 ZedroS (Joseph Pachod).
Aucune reproduction, même partielle, ne peut être faite
de ce site ni de l'ensemble de son contenu : textes, documents, images, etc.
sans l'autorisation expresse de l'auteur. Sinon vous encourez selon la loi jusqu'à
trois ans de prison et jusqu'à 300 000 € de dommages et intérêts.